· updated · 7 minute read
Teaching a $12 pet camera where to look
I wanted the camera to remember the room after the dog had left the picture.
When my dog walks out of view, OpenPetCam goes looking for her. Too often, it looks under the kitchen counter. The picture is perfectly clear; it is just a picture of the wrong place.
About a quarter of the settled search frames—304 of 1,268—showed almost no floor according to the room model: cabinetry, counter or wall. I wanted the camera to remember the sofa and the rug, and have a few sensible places to look when she disappeared.
I ended up building a rough 3D room with a history of observations attached. The fourth dimension is time. The map connects places on the floor to motor positions, but first I had to get distances from a camera fixed to one mount.
One place to look from
The head can turn almost all the way around, but it stays on its mount. The lens shifts a little as it turns; I have not calibrated that motion well enough to use it for stereo. For this build, I treated the photographs as views from roughly one point.
Match the same corner in overlapping pictures and you can work out the lens distortion and how far each motor step turns the image. Across 67 calibration views, the median matching error was about three pixels. That let me stitch the pictures together and attach a direction to each pixel.
I could point to the sofa on the panorama; putting it on a floor plan would require a distance.
An approximate ruler
The camera already has a speaker and a microphone, so I tried using them as a ruler. The speaker plays a frequency sweep. Deconvolving the recording compresses that long sound into a short response, with peaks at different delays. The room contributes to those peaks, along with the speaker, microphone, housing and recording chain.
I used a recurring peak near 4.7 milliseconds as a candidate floor return. With the timing and path assumptions in that first build, it put the floor roughly 0.8 metres below the lens. That gave the model a scale to work with.
The saved value, 0.807 m, looks more precise than the experiment deserves. A tape measure gave me a welcome check: 31 inches from the floor to the camera, about 0.79 m. That agrees with the rough scale. I still need to measure the exact lens, speaker and microphone positions, and check the timing reference.
Moving the sofa in software
Depth Anything 3 supplied an estimate of shape from the photographs. The pipeline merges its overlapping depth maps, smooths their seams and scales the result using the floor estimate. Wall edges marked on the panorama and simple furniture shapes help organize the rough surface.
One version put the sofa about 1.5 metres from the camera. Placing it from the line where it met the floor put it about 3 metres away. I had moved the sofa by more than a metre without touching it. Both placements used the same camera height.
The dog gave me another check. When she is standing on the floor, her estimated feet should land on it. Across 2,255 detected foot directions, the merged depth disagreed with the assumed floor by a median 4.7%, compared with 5.2% for a simple merge. The check still relies on the detector placing her feet correctly and on that same floor scale.
You can orbit the model and recognise the room. The sofa taught me to be careful about that feeling: the wall distances still need an independent check.
A room also has a daily routine
Once the room had a shape, I could put an observation somewhere. A sighting left a point on the floor and a time in the history. Where I had photographs from different hours, I could also store how a surface’s brightness changed.
The sequence below follows the sightings through a recorded day. Switch to the week’s accumulated observations and the familiar places begin to stand out.
The heatmap has the camera's habits mixed into it. A corner that is rarely watched tells me little about how often the dog uses it. Even so, the places where she has repeatedly been seen are worth visiting when she disappears again.
Another view after dark
At night, the camera supplies its own light. Comparing frames with the infrared LEDs on and off helps isolate that contribution. Comparing the response with visible light makes some plants, fabrics and fur stand out.
I kept those colours as another way of looking at the surface. Exposure and viewing angle still matter, and I have not calibrated the layer against known materials.
A better first few places
I replayed 56 recorded searches with a different stop order. For each searched day, I left that day’s detections out of the hourly habit weights. The room geometry and visibility calculation stayed the same.
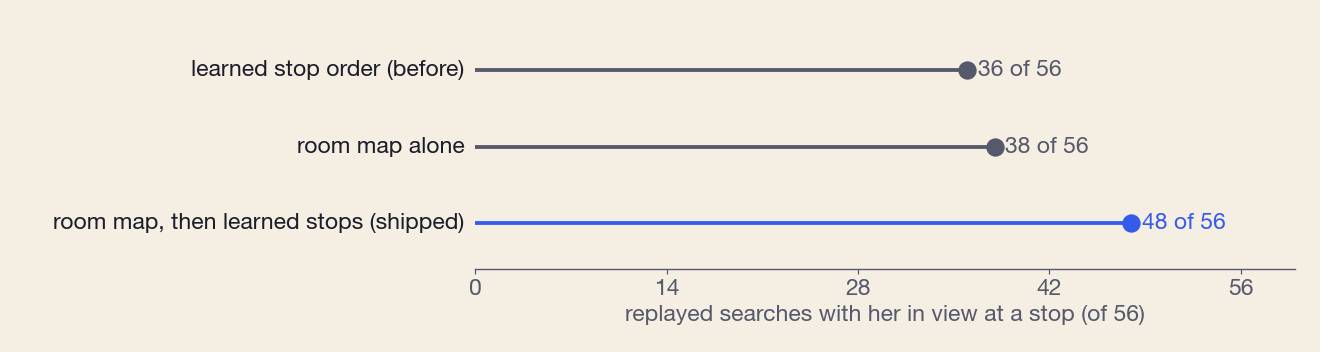
The old order reached a view containing the estimated dog position in 36 of 56 searches. The room map alone reached 38. Trying the map first, then the remaining learned stops, reached 48.
These are replayed sightlines using estimated positions from the logs. A stop can put the dog in the picture and still miss her with the detector. The recordings also favour places the old search already visited. I need live searches to find out how much of the gain carries over.
Keeping the old stops gave the search a fallback for places the map had missed.
How I checked the search order
The replay uses searches where the logs let me estimate a dog position: 54 from a successful find and two from later resting detections. That selects an easier-to-reconstruct subset of searches.
I withheld each searched day’s detections from the hourly habit weights. The geometry, visibility calculation and grid bounds remained shared. The counts above describe this replay; they do not establish a success rate for all searches.
Asking more of the waveform
A bark from outside the picture is the next reason I want the camera to understand the room. The floor return gave the visual model a rough ruler. I want to ask much more of the sound.
In full waveform inversion, I would start with the room model, solve the wave equation for each shot, and change the geometry to explain the microphone’s pressure traces. Phase and amplitude matter: reflections overlap, reinforce one another and cancel. Those patterns contain information about the room.
I now have an offline three-dimensional wave solver that preserves signed pressure, and a source-position fitter that uses its phase. In a simulation check, I used the same room and numerical grid to generate the recording and fit it. Supplying the source signal let the fitter recover the prescribed positions. Taking it away or changing the model showed how fragile that result was. This work has not yet reconstructed a wall or located a real bark.
What the acoustic checks have shown
An early ray model scored 0.397 with the correct pose labels and 0.402 after I shuffled them. Pairing the right head direction with each recording had not helped. That fit did not test full waveform inversion. An older wave experiment compared envelopes and discarded phase; a later signed-waveform fitter used one analytic reflection.
There is an instrument problem too. Four shots in one capture can repeat closely, while separate captures at the same pose shift by as much as about 1.8 milliseconds. A fit could move a wall to explain a late shot. The source, microphone response and timing need constraints alongside the geometry.
One measured wall
My first inversion test will use one independently measured surface. I will put it in the wrong place in the input model and ask the waveforms to move it back. Separate poses and capture sessions will test its predictions. A comparison fit that changes only the instrument response will show whether moving the wall explains anything extra.
I started with a camera searching the cabinets. I now have a room I can inspect, a history of sightings, and a better search order to try. I would like a bark from outside the picture to give it the next direction. The measured wall is where I want to begin.